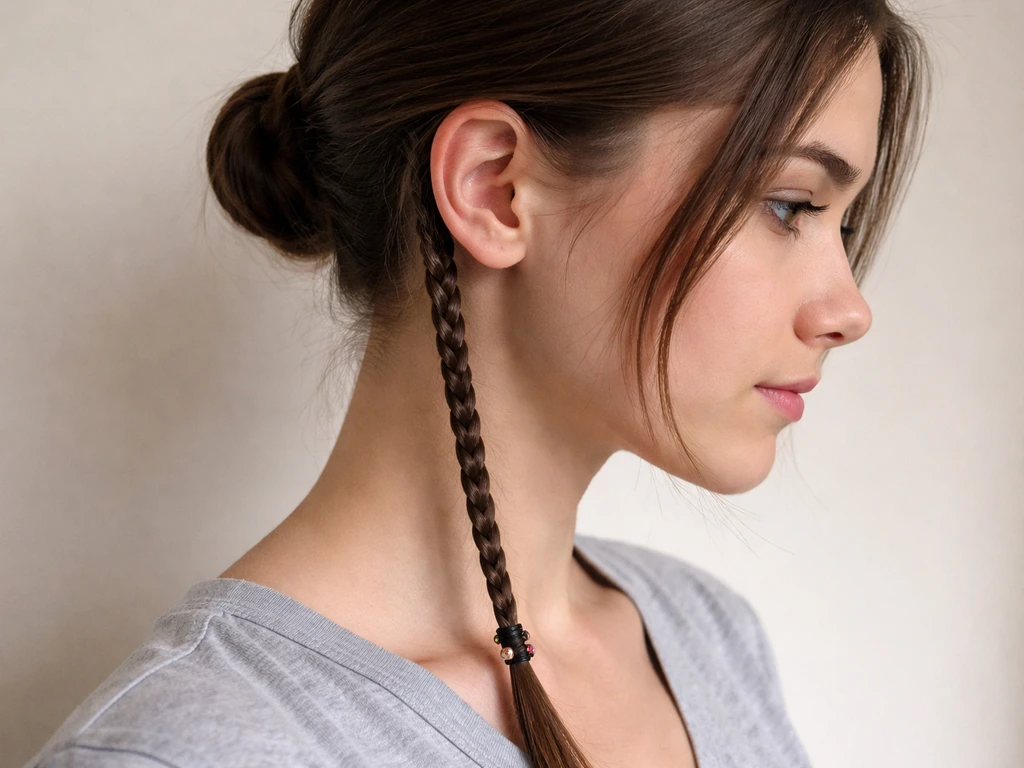
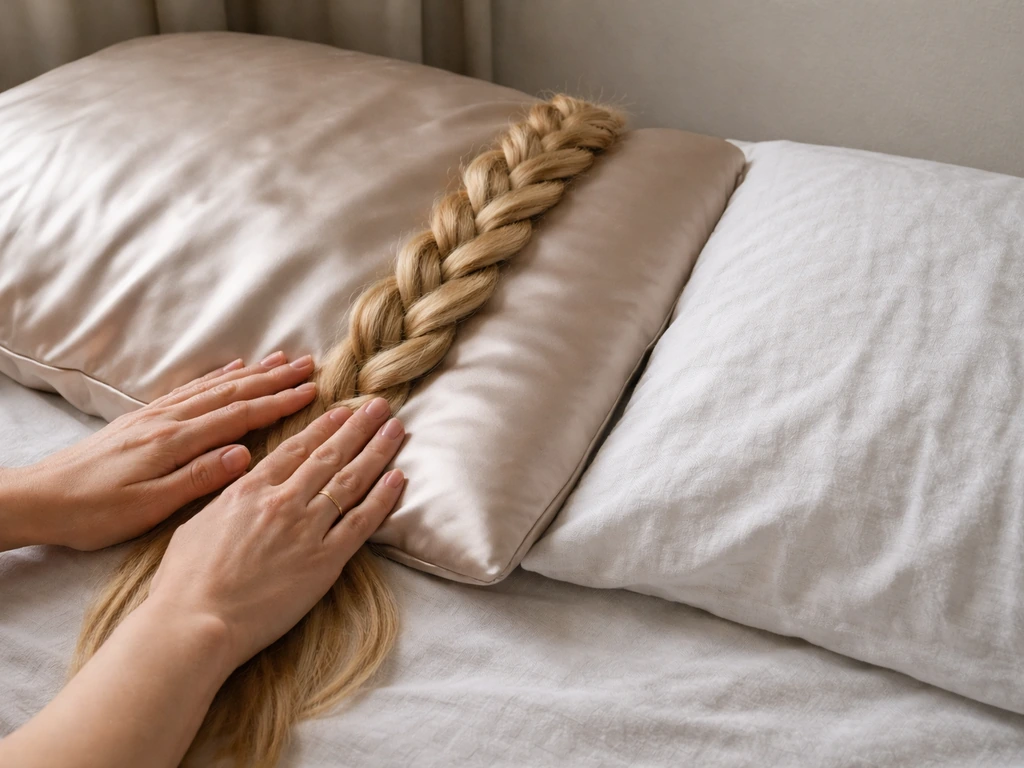
A padawan braid is a single, slim braid worn behind one ear (traditionally the right), typically left long and allowed to hang down past the shoulder. It comes straight from Star Wars lore, where Jedi Padawans wear the braid as a symbol of their apprentice rank until they become Jedi Knights. Outside the galaxy far, far away, people wear it as a fun cosplay detail, a subtle statement braid, or just because it looks cool. You can create it on natural, relaxed, or transitioning hair as long as you have a section long enough to braid, and with the right approach, keeping it in actually supports length retention rather than working against your growth goals.
How to Grow a Padawan Braid With Low Tension

Simone Okonkwo
20 May 2026
What a Padawan Braid Is (and the Variations You'll See)
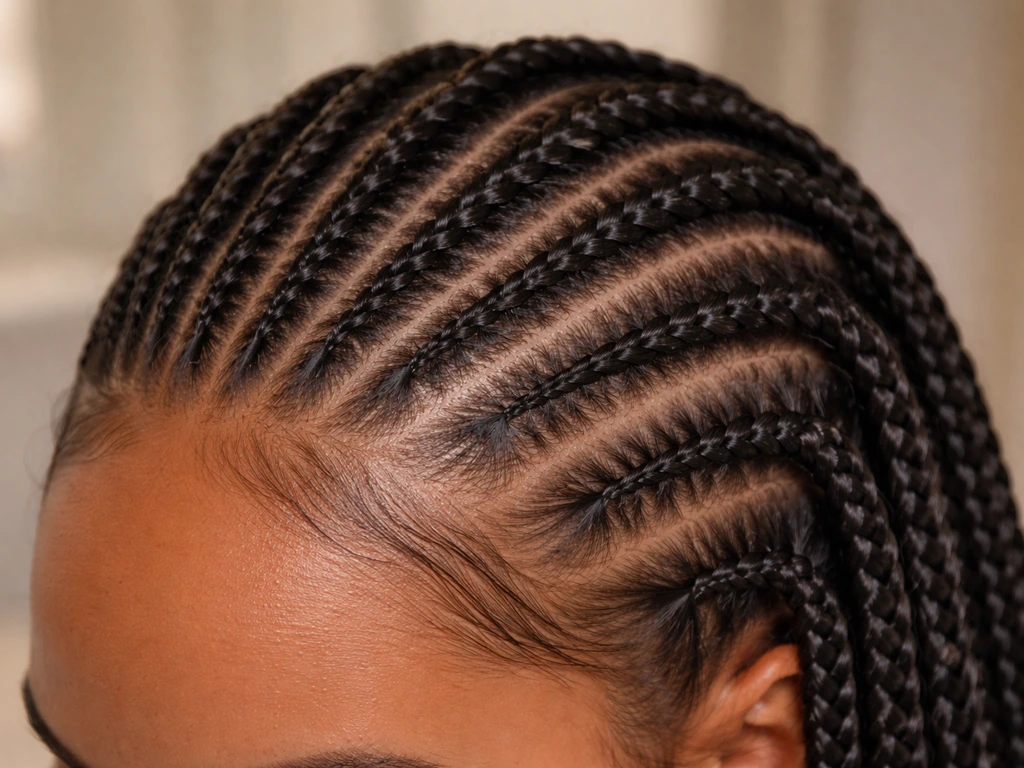
In the Star Wars Legends canon, the padawan braid is described as a long, intricately woven single braid worn behind the right ear and draped over the right shoulder. In practice, most people interpret this as a narrow three-strand braid, but you'll see variations: some people do a single tight rattail braid, others do a micro-braid, and some add a thin extension piece to get extra length.
The core look is always the same: one slim braid, positioned behind the ear, hanging down. If your hair is shorter, using a small extension or clip-in braid piece is completely valid and gives you the look without waiting years to grow the length. If your hair is already several inches long, you can braid a natural section. Either way, the technique is basically identical.
Prepare Your Hair Before You Touch a Comb
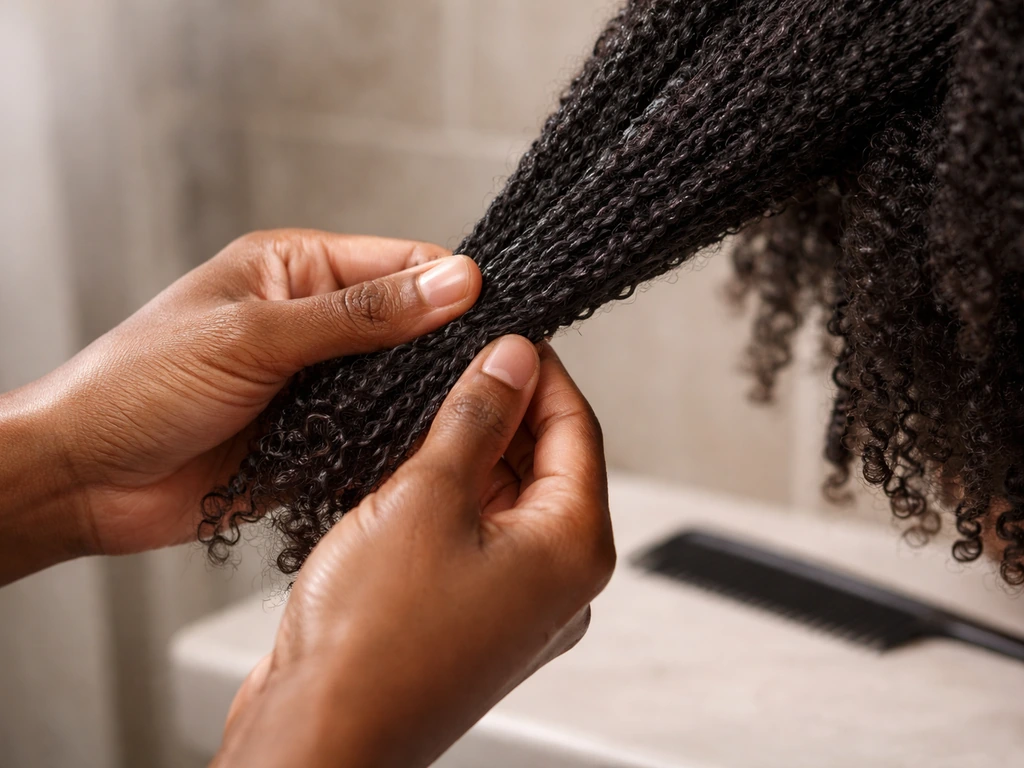
Good prep is what separates a braid that lasts and protects your hair from one that breaks it. The braid is only as strong as the hair inside it, so start with hair that is clean, moisturized, and fully detangled. Wash first with a moisturizing or sulfate-free shampoo, then deep condition or use a good rinse-out conditioner. This matters especially for textured and Type 3 to 4 hair, where skipping moisture at the prep stage leads to dryness inside the braid that you cannot fix later without taking it down.
For detangling, always work from ends to roots before you shampoo. This prevents knots from tightening further during washing. Use a wide-tooth comb or a flexible detangling brush, and add a detangling spray or a slippery conditioner if your hair is thick or tightly coiled. Never force a comb through a knot from root to tip. After washing and conditioning, detangle again gently while your hair is still damp. On relaxed hair, be especially careful since chemically processed hair is more fragile when wet.
Once your hair is detangled and about 70 to 80 percent dry (or fully dry if you prefer), apply a lightweight leave-in conditioner to the section you plan to braid. A leave-in does one thing braiding products cannot: it puts moisture inside the braid where it can stay sealed. NBC Select notes that leave-in conditioners are positioned as moisture products, helping distinguish them from other braid products like edge controls and setting lotions/foams. Do not skip this step. Then apply a light oil or butter to seal that moisture in before you start braiding. This combination, moisture then seal, is the foundation of length retention in any braid style.
How Much Length Do You Actually Need?
You need at least 3 to 4 inches of natural hair to form a basic padawan braid on its own. If you want it to hang noticeably past the ear, aim for 5 or more inches on that section. Below 3 inches, extensions are your best bet. If you are starting short and want to grow into the style, focusing on length retention practices now (more on those below) is the practical path forward.
If you are wondering how to grow your hair for braids, focus on moisture, sealing, and keeping tension low so you retain more length. If you want to grow a Jedi braid longer, those same length retention practices help the braid protect your ends instead of letting breakage steal your progress focusing on length retention practices now.
Step-by-Step: How to Create the Braid
You do not need a lot of tools for this, which is part of what makes it a manageable style to do at home.
- Rat-tail comb (for precise parting and sectioning)
- Sectioning clips to keep the rest of your hair out of the way
- Leave-in conditioner
- Lightweight oil (jojoba, argan, or sweet almond work well)
- Small hair tie or thread to secure the end (clear elastics are fine; avoid rubber bands)
- Optional: a small piece of braiding hair or extension if your natural section is short
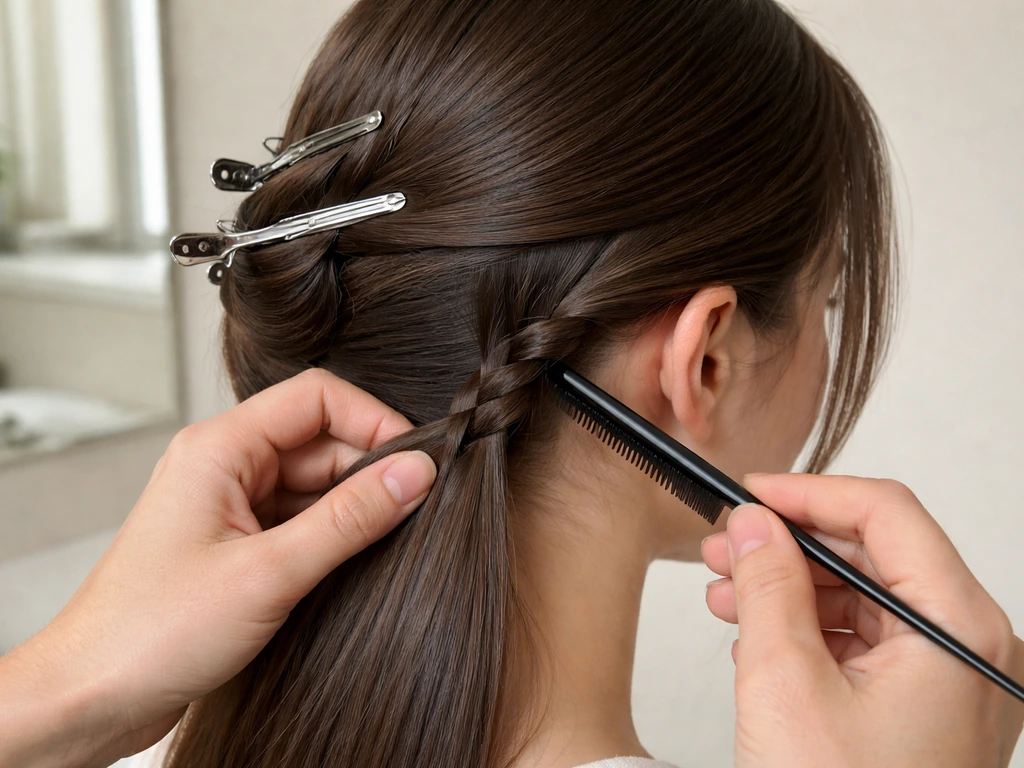
- Section off the braid area. Using the pointed tip of your rat-tail comb, part out a thin section of hair directly behind your right ear. The section should be about half an inch wide, maybe slightly more if you want a thicker braid. Clip the rest of your hair away so it is not in your working space.
- Apply your leave-in and oil to just that section. Work it through from root to tip and let it absorb for a minute.
- Divide the section into three equal strands. Keep the strands slim and even. If you are adding an extension, fold it around the root of the section and incorporate one piece of the extension into each of the three strands before you start.
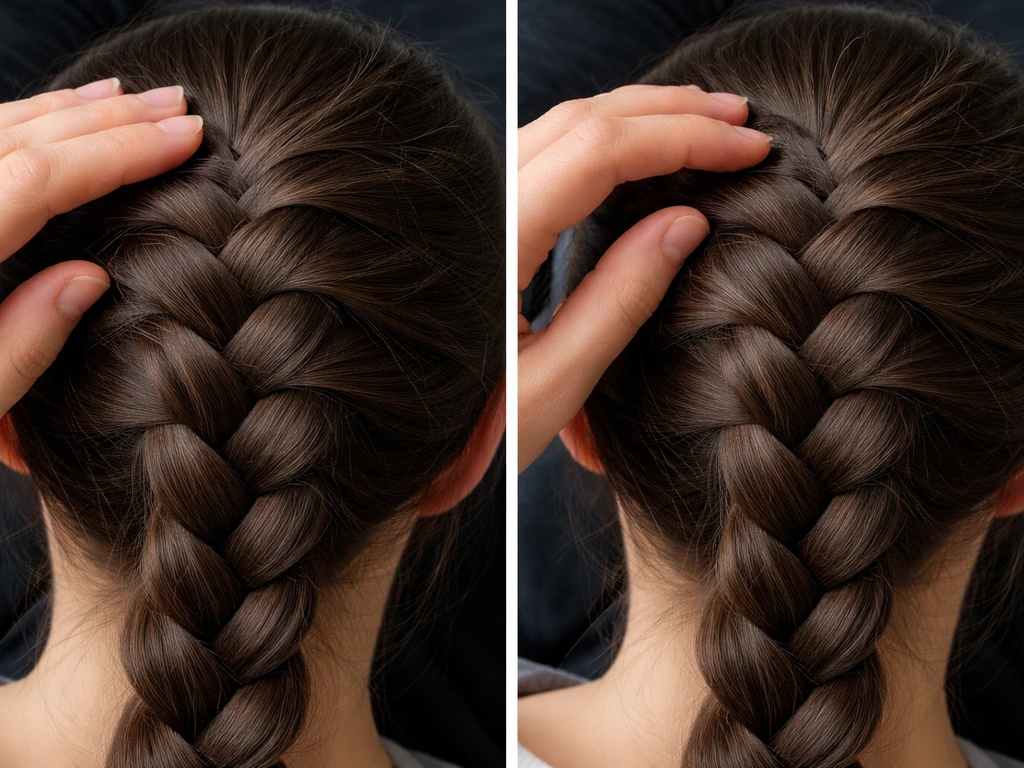
- Braid downward using a standard three-strand braid. Cross the right strand over the middle, then the left strand over the new middle, and continue downward. Keep your tension consistent but gentle. This is critical: braid snugly enough to hold the style but never to the point where you feel pulling or pressure at the root. If it hurts at the scalp, you are braiding too tight.
- Continue braiding the full length of the section, or to the length you want.
- Secure the end with a small clear elastic or tie it off with a small piece of thread (the more traditional method for the cosplay look). Avoid rubber bands, which snap and cause breakage at the tips.
- Position the braid so it falls behind and slightly over the right shoulder. That is the canonical look, though you can let it hang straight down if you prefer.
Protecting Your Hair During and After Styling
Tension is the single biggest risk factor with any braid style. A padawan braid is narrow and attached at one small section, which actually makes traction a real concern because all the tension is concentrated in a tiny area rather than distributed across the scalp. Traction alopecia, which is hair loss caused by persistent pulling, develops over time and early signs include itching, redness, small bumps at the hairline, and short broken hairs around the braid attachment point. If you feel stinging or pain after braiding, take it down and re-do it looser. Pain is never a sign that the braid is secure; it is a sign that you are damaging your follicles.
Your edges and the area just behind the ear are especially vulnerable. Avoid using heavy gels or edge controls directly on the root of the braid section that leave buildup and pull the hair taut. If you want to smooth that area, use a tiny amount of a lightweight edge control applied gently, not slicked down under tension.
Sealing moisture into the braid after installation matters too. Once it is done, lightly mist the braid with water or a diluted leave-in spray every two to three days, then follow with a drop of oil worked gently over the braid. This keeps the hair inside from drying out and becoming brittle, which is where a lot of breakage actually happens in braided styles.
The Truth About Braids and Hair Growth
Here is the myth-busting part, and it matters: braids do not make your hair grow faster. Your hair grows from follicles in your scalp at roughly half an inch per month regardless of what style you are wearing. If you are wondering what the best protective style is to grow hair, look for styles that minimize tension and keep your ends moisturized and sealed what is the best protective style to grow hair.
What braids can do, when done correctly, is help you retain the length that is already growing. That distinction is huge. Most people lose length not because their hair is not growing but because it is breaking at the ends before it gets long enough to measure. A properly maintained braid protects those ends from daily friction, manipulation, and environmental damage, which means more of your growth actually stays on your head.
If you are trying to grow out your hair with box braids, the same focus on low tension and consistent moisture will help you protect your ends while you wait for length to show. If you want box braids specifically for growth, focus on low tension, moisture, and a gentle maintenance routine so your hair stays protected instead of breaking how to grow out your hair with box braids.
The flip side is that a badly done braid, one that is too tight, left in too long, or installed on dry unprepped hair, can actually set your growth goals back by causing breakage at the root or traction alopecia. So the goal is not just to braid, but to braid in a way that keeps tension minimal, moisture consistent, and the scalp healthy. A padawan braid has one advantage here: it is a single small braid on a limited section, so the rest of your hair remains free, which reduces the overall manipulation and protective-style strain on your scalp compared to a full head of braids.
If you are actively trying to grow out a specific section to get more braid length, the same principles apply as for growing hair for any braid style: keep the section moisturized and sealed, minimize heat, handle it gently, and focus on scalp health. If you are specifically looking for how to grow braids for guys, keep the same focus on low tension, consistent moisture, and a gentle take-down routine so you protect length while you wear the style. A healthy scalp with good blood flow and no inflammation is where consistent growth happens.
Your Maintenance Routine While the Braid Is In
How Long to Keep It In
For a single slim braid like this, 4 to 6 weeks is a reasonable timeframe. Some people push to 8 weeks, but after that you risk significant new growth tangling around the braid base, which makes taking it down much harder and raises the risk of breakage. If you notice frizz buildup, scalp irritation, or visible thinning at the root of the braid section, take it down sooner regardless of how long it has been in.
Washing
You can and should wash your scalp while the braid is in, roughly every one to two weeks. Focus the shampoo on your scalp rather than the braid itself. Dilute your shampoo slightly with water in a spray bottle for easier application, work it into the scalp with your fingertips (not your nails), and rinse thoroughly. Let the braid air dry; avoid wringing or twisting it. After washing, re-apply your leave-in mist and seal with oil.
Sleeping
Sleeping with a braid rubbing against a cotton pillowcase creates friction that leads to frizz and dryness over time. Switch to a satin or silk pillowcase, or wrap your hair in a satin scarf or bonnet before bed. If the braid is long enough to get compressed under your head, loosely pin it up before you sleep so it is not being pulled at the root all night. That constant overnight tension, even if low-level, adds up over weeks.
Moisture Refresh Between Washes
Every two to three days, lightly mist the braid with a water-based spray or a leave-in conditioner diluted in water, then seal with a small amount of oil. You do not need to drench it; just enough to keep the hair inside from going bone dry. On natural hair, especially Type 4 coils, this step is non-negotiable because tightly coiled strands lose moisture faster and are more prone to dryness-related breakage.
Troubleshooting: When Things Go Wrong
| Problem | Likely Cause | What to Do |
|---|---|---|
| Breakage at the root | Too much tension at installation or re-braiding too frequently | Take down, let hair rest 1–2 weeks, re-braid looser |
| Frizz along the braid | Friction from pillowcase or lack of moisture | Switch to satin pillowcase, mist and seal every 2–3 days |
| Itchy scalp | Product buildup or early traction irritation | Diluted shampoo wash, check tightness, reduce styling product at scalp |
| Thinning or short hairs at braid attachment | Traction alopecia starting | Remove the braid immediately, see a dermatologist, rest the area |
| Dryness and brittleness inside the braid | Skipped moisture prep or no mid-week moisture refresh | Take down gently, deep condition, re-braid after full moisture treatment |
| Braid unraveling quickly | Section too small, hair too slippery, or ends not secured properly | Use a small amount of braiding cream for grip, secure ends with a proper elastic or thread |
The most important thing to watch for is any pain, tenting (where the skin around the root is visibly being pulled upward), or persistent scalp soreness after installation. These are not signs of a tight hold; they are warning signs. Traction alopecia can become permanent if the follicles are repeatedly stressed, so the moment you see those signs, the braid comes out. No style is worth follicle damage.
Taking the Braid Down Without Losing Length
Take-down is where a lot of people accidentally lose the length they worked to retain. Carefully cut or slide off the elastic at the end (do not yank), then gently unravel the braid from the bottom upward. Apply a generous amount of detangling conditioner or oil to the section before you try to separate strands. Work in small sections with your fingers first, then follow with a wide-tooth comb from ends to roots. Never rush the take-down. Rushing means breakage. After the braid is fully out, do a moisturizing deep conditioning treatment on that section before you restyle it.
Wait at least one to two weeks before re-braiding the same section. This rest period lets the follicles recover from any tension they experienced and gives you a chance to assess whether the hair at the root is healthy or showing signs of stress before you go back in.
If you are interested in expanding beyond a single padawan braid into full protective styling for growth, the same foundational principles covered here apply across every braid style: loose tension, consistent moisture, healthy scalp, and a smart take-down routine. Using protective styles well can help you keep moisture sealed, reduce friction, and retain length as your hair grows protective styling for growth. If you want a similar protective approach with cornrows, use the same mindset: keep tension light, moisturize regularly, and avoid leaving the style in too long full protective styling for growth. The braid style changes, but what keeps your hair healthy underneath it never really does.
FAQ
How do I know if my padawan braid is too tight, and what should I do right away?
If your padawan braid is too tight, you will usually feel stinging, burning, or an ongoing throbbing feeling at the attachment point within the first day. If you notice persistent pain, visible “tenting” of the scalp, itching with redness, or broken short hairs near the root, take it down immediately and reinstall with a smaller section or looser grip (you can also add more slack by separating the braid tail so it is not pulling on the base).
What signs mean I should take my padawan braid out early, even if the timeframe isn’t up yet?
Plan to remove and redo sooner if you start seeing new lint or frizz that won’t smooth out with misting, or if knots form right at the braid base. A practical rule is to check the root area daily for soreness and the length area every 2 to 3 days for tangling or dryness, then take it down at the first sign of stress rather than waiting for a full time limit.
Can I use an extension to get a longer padawan braid without increasing tension or breakage?
For a braid that hangs, your section needs enough length to reach past the ear naturally, but you can still get the look with extensions by matching the extension density to your hair so the base does not feel like it is pulling. Use an extension that you can properly seal with leave-in plus a light oil layer, and avoid attaching it in a way that tightens your natural roots (the goal is low tension at the scalp, not just added length).
How often should I wash my scalp while keeping the padawan braid in?
Washing frequency is about your scalp, not the braid. If your scalp gets oily, do a quick scalp-focused wash every week, and if your scalp is dry or sensitive, you can stretch closer to every 2 weeks. When you wash, dilute shampoo, apply with fingertips, rinse very thoroughly, then fully dry the scalp and braid before sealing again to prevent buildup that can increase friction and irritation.
My padawan braid feels dry and rough. What’s the best fix without taking it down?
If your hair feels dry inside the braid, you may need a lighter initial product amount plus more consistent misting. Use a water-based mist (diluted leave-in) every 2 to 3 days, then seal with only a small amount of oil on the braid, not a heavy layer that can harden. Also ensure detangling was fully done before installation, because knots left at the start tend to worsen and cannot be fixed without loosening the braid.
How should I sleep with a padawan braid to prevent friction, tangling, and root stress?
Sleeping is usually where tension and frizz creep in. Use a satin or silk pillowcase or a bonnet/scarf, and if the braid is long enough to be compressed under your head, pin it loosely so it lies flatter without pulling the roots. Avoid tight braid tail wraps that can create a “kink” that rubs and tangles over the night.
What’s the safest way to take down a padawan braid so I lose less length?
Take-down should be slow, starting at the ends, but you can reduce time and damage by applying slip first (leave-in conditioner or a detangling oil/conditioner mix) and finger-separating the braid before using a comb. Do not pull strands apart while they are still dry, and avoid running your comb through stubborn sections in one pass, instead re-apply slip and work gradually from ends to roots.
How long should I wait before re-braiding the same section, and can I change the placement next time?
Yes, but you should treat the first re-braiding attempt like a “stress test.” Leave at least 1 to 2 weeks before re-braiding the same attachment section, and only reinstall if the root area feels normal (no lingering bumps, soreness, or redness). If your scalp was irritated last time, switch sides, use a larger base section, or choose a variant that spreads attachment more gently.
My braid itches. Is it normal, or how can I tell the difference between irritation, buildup, and dryness?
If your braid starts to itch, check whether it is scalp irritation, product buildup, or dryness. Itch plus redness or soreness suggests tension or follicle stress, remove it. Itch with buildup or flaking suggests you need a scalp-focused wash and thorough rinse, then re-seal lightly. Itch with no redness but dry feel suggests you should increase misting frequency slightly and reduce heavy oiling.
Next Article
Best Braids to Grow Hair: Retention, Low Tension Guide
Best braids for hair growth and retention: low-tension styles, safe install, wear-time, and aftercare to reduce breakage